Traditional metal detectors, by waving arms to work, a day's working area is very limited, if encountering weeds and other harsh terrain is not able to work. Because of the different principles of operation, the traditional metal detector detection depth is very limited, in order to seek better metal detection methods, I introduced foreign advanced long-range detection metal technology After repeated research and testing, the VR long range locators system of large-depth long-range metal detection system, i.e. treasure precious metal directional indicator, is characterized by ultra-deep large area rapid scanning detection, the detection area of a few minutes is equivalent to the long-term workload of ordinary metal detectors. Signals can be passed through mountains to detect six precious metals, gold/silver/copper/lead/tin/diamonds. The instrument is controlled by microprocessors, and the central unit includes abnormal correction, non-drift multiplex and pre-programmed separator switches. The maximum detection range can reach 1000 meters. According to the mountain penetration test 40 meters signal does not decay, in the ideal geological conditions, the detection depth of a single silver coin can reach several meters. The instrument is simple to operate, without the level of education can be learned in a day.
Dig a small hole in front of the transmitter, about 3.5 inches, and bury it in the receiving antenna, burying it in a flooded black line. Turn the element selector in the instrument to the element file you want to probe, then turn on the transmitter and turn the horizontal and vertical knobs counterclockwise to the end. Not all cases are right-centered (and then depending on the geological environment in your location), and then backtored to the corresponding light to start to light up. After 3-5 minutes, 25 feet from the transmitter, plug the receiver lever into the receiver and wear the headset. Turn on the receiver, turn the volume in half, turn it to no sound, and then slowly move toward the transmitter, testing the transmitter when you hear it making the same sound as the radio, pay attention to the distance between the detector and the transmitter. Back 5 feet, for example, if you're 15 feet away from the transmitter, go back to 20 feet away from it. Use the receiving lever skillfully, walk around the transmitter for a lap, and remain 20 feet away from the transmitter, which will not cross if there is no target in the area you are looking for.
You can bury some metal in the ground for testing, burying some metal, such as a few coins or jewelry, about 50 feet away from the transmitter.
As you approach the line formed between the receiving antenna and the target, you hear a frequency in your headphones. When you are on the signal line formed by the antenna and the tester, the sound is the loudest, and the receiving rods are crossed at each other. (Remember that signal lines are formed between the receiving antenna and the target, not between the transmitter and the target.) When you cross this line, the volume will gradually disappear and the receiving lever will no longer cross. Then you're 10 feet away, for example, if you're 20 feet away from the transmitter, then you're 10 feet to 30 feet away. Repeat the steps just now and mark once again where the sound is loudest and the receiving lever crosses. Starting from the transmitter, draw an X-axis line through the two places just marked, turning off the receiver and the transmitter. After waiting at least 15 minutes, move the transmitter and receiving antenna to a new location and repeat the steps you just did. Remember to bury part of the receiving antenna into the earth, and the point where the X-axis and the X-axis that have just been formed intersect the target are buried.
smiddot; headphones
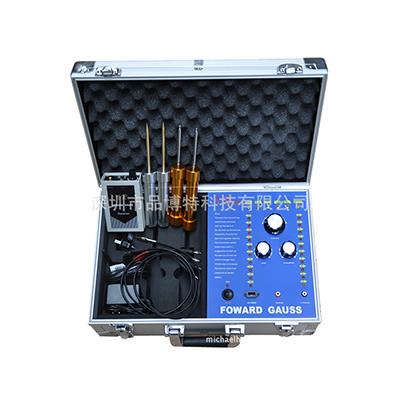
The receiving rods (2): They are sealed copper columns with wires and plugs underthemed, which are inserted into the receiver, and at the other end of these copper columns, which extend sliding to extend.
battery charger: AC or DC adapter, AC input 220 volts, DC output 9 volts
The antenna is a red rectangular box measuring approximately 6.5 inches x 16 inches in size, with an antenna with two red and black plugs at the end of the antenna. The receiving lever and the receiving antenna are placed on top of the box.
2. Turn on the switch to test the battery power, if you want to test the transmitter, take a small radio, tune to AM FM, place next to the transmitter, and then turn on the transmitter, if the transmitter works properly, AM FM will be disturbed. If you rotate the largest rotary button on the transmitter panel, the indicator of the element selector lights up in turn, and the tone emitted by the instrument changes as the element selection sits.
3. After you expand the antenna, you must practice and find the sensation before inserting it into the transmitter.
Stretch the receiving rod by about 6 inches.
smiddot; one receive rod in one hand
smiddot; two hands separated 12 inches
From the end of the two receiving rods, 5 inches apart from each other
smiddot; relax
walking at normal pace,
smiddot; don't raise or shake the receiving rod
5. You should practice until the receiving rod does not swing at will while walking.
It takes a while to master how to use it, but this is the key to the effective use of the instrument and must be adhered to.
6. When testing the system, the transmitter is placed on the ground, the receiving antenna plug is inserted into the corresponding jack (marked jackoutputs), note: when the transmitter is on do not plug in the receiving antenna, this will cause great harm to the instrument and operator.